Yesterday I set up a basic account with nitrous.io. This gives me a virtual linux box with a selection of ready to go development environments. I decided on "go".
For a sample project I went through the tutorial web server that the golang folks provided :
http://golang.org/doc/articles/wiki/
I used the environment almost without modification. The only slight tweak that I applied was to get a new collection of vim runtime files using rsync ( as shown here: http://www.vim.org/runtime.php ) and add support for go ( as shown here: http://go-lang.cat-v.org/text-editors/vim/ ).
I was able to ssh into the nitrous.io box and use screen so that my working environment stayed alive even when the connection was broken. The nitrous.io environment provides several ports for the server to choose from to listen on. I was able to save my work in a git environment and clone the git tree back to my home machine.
Sunday, November 17, 2013
Saturday, June 8, 2013
Completing the tt-rss install using a browser
In the browser on your windows machine, go to xxx.xxx.xxx.xxx/tt-rss/install (substituting the appropriate IP address for xxx.xxx.xxx.xxx ) For example, I chose the address 192.168.1.131 so I navigate to 192.168.1.131/tt-rss/install as shown below. Click on "Test Configuration"

If everything has gone right up to now, you should see the page shown below. Click on the red "Initialize Database" button.

Now you should seen the page shown below in your browser. Click on "Save configuration" towards the bottom of the screen.

You should see the message shown below indicating that the configuration was successfully saved. Click on the blue "loading tt-rss now" link.

From here you should be able to login as "admin" with password "password". Change that password before setting up access over the internet.

From the "Preferences" option in the menu under Actions, you can create new users:

Preparing Ubuntu for the tt-rss installation
To install tt-rss on your server you will need to do the following:
- Install apache2. postgresql, and some php packages
- Create a database user ( ttrss_user )
- Create a database (ttrss_db) belonging to the user just created.
- Download the tt-rss package
- Unpack the tt-rss package
- Copy the tt-rss directory to /var/www/tt-rss and assign it the appropriate owner/group ( www-data ).
These steps are shown in more detail below:
To install the apropriate packages, type
sudo apt-get install apache2 libapache2-mod-php5 postgresql php5-pgsql php5-curl
as shown in the window below:

At this point, you should be able to verify that the apache2 server is running by entering the IP address of the Ubuntu virtual machine in a browser on your windows machine. You should see something like this:

To create a database user, ttrss_user, type
sudo -u postgres createuser -P -S -D -R -l ttrss_user
as shown in the window below:

To create a database, ttrss_db, belonging to the user, ttrss_user, type
sudo -u postgres createdb --owner=ttrss_user ttrss_db
as shown in the window below:

To download the tt-rss package, bring up firefox, go to the tt-rss.org site, right click on the download link, and copy the link address as indicated in the following window:

Then paste the link address into a shell window as an argument to wget to form the following command:
wget https://github.com/gothfox/Tiny-Tiny-RSS/archive/1.7.9.tar.gz
As of this writing ( 2013-06-06 ) this is the latest version of tt-rss but that will change in the future. Using a browser to get the download link should insure that you get the latest version.
This is shown in the window below:

The download will take a few minutes. When it is done, use the tar command to unpack the tar file as shown below:

Copy the directory that the tar package expands to to /var/www/tt-rss and change the owner/group
to www-data:
sudo cp -rp Tiny-Tiny-RSS-1.7.9 /var/www/tt-rss
sudo chown -R www-data /var/www/tt-rss
sudo chgrp -R www-data /var/www/tt-rss
as shown below:

At this point, the install can be finished from a brower.
Installing Ubuntu
A minute or so after booting from the CD you will see the following screen. Select "Install Ubuntu"

Continue with defaults. Ignore the option to install VMware tools.
Install Now
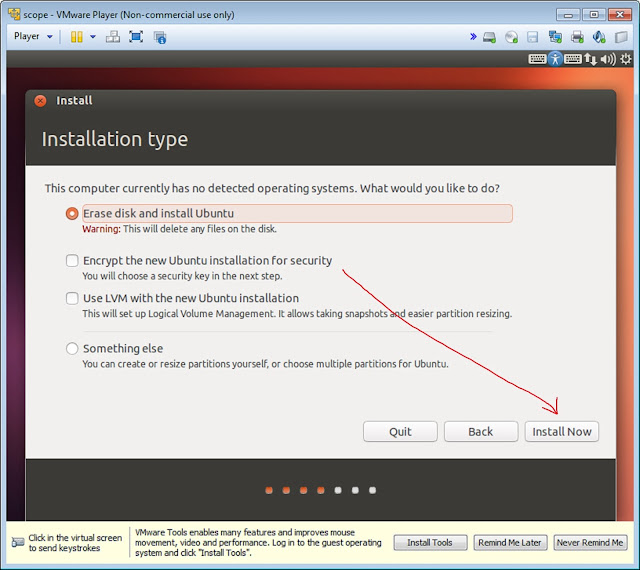

Start the install and wait...

In 10 or 15 minutes you should see the following screen. Press the restart button.

( My computer seemed to get stuck either while shutting down or starting up but pressing "Enter" got past the hang ).
Now press ctrl-alt-T to bring up a bash window.

At the bash shell enter:
sudo apt-get updateAfter a few minutes the upgrade should complete and your ubuntu installation will be up to date. If you repeat the above two commands the process should be much faster and cleaner. The result should look something like this:
sudo apt-get upgrade

Next, install ssh by entering:
sudo apt-get install sshTo access the ubuntu server at a predictable location you will need to configure a static ip address for your network interface. If you don't do this, things will probably still work but you run the risk that at some point your ip address will change.
Select the "System Settings" button. This may be graphically compressed but if you move your mouse towards the bottom of the window it should expand.

In the "System Settings" window, select "Network"

Select "Options" in the Network menu.

Select the IPv4 Settings Tab and enter and IP address appropriate for static use. The DNS servers: 8.8.8.8 and 8.8.4.4 are the Google public DNS servers and should work without problems. Save the new values, close the Network Connections window and minimize the VMware Player window.

From this point on, configuration of the Ubuntu server will be done "remotely" from from the host windows machine.
Creating the virtual machine
Install vmware player which you can download from vmware.
Download the ubuntu 13.04 disk image
Run vmware player and create a virtual machine. Opt to install the operating system later.
Indicate that you want to install ubuntu linux.
Specify a name and location for the virtual machine:

Advance the wizard, selecting defaults. Select "Customize Hardware" when you have the option.

Specify 2GB of memory ( this may be overkill - if you don't have that much available you can experiment with less ).

Indicate that you want to use the ubuntu 13.04 disk image that you downloaded earlier for the CD.

Specify "Bridged" for the network adapter type ( if you don't care about accessing the server from the outside world, it can be left as the default which is NAT ).

Close the hardware configuration wizard and select "Play" to start the virtual machine.

Download the ubuntu 13.04 disk image
Run vmware player and create a virtual machine. Opt to install the operating system later.
 |
 |
Advance the wizard, selecting defaults. Select "Customize Hardware" when you have the option.
Specify 2GB of memory ( this may be overkill - if you don't have that much available you can experiment with less ).
Indicate that you want to use the ubuntu 13.04 disk image that you downloaded earlier for the CD.
Specify "Bridged" for the network adapter type ( if you don't care about accessing the server from the outside world, it can be left as the default which is NAT ).
Close the hardware configuration wizard and select "Play" to start the virtual machine.

Installing tiny-tiny-rss (with postrgres database) on a vmware virtual machine running Ubuntu
A couple of days ago I installed a tiny-tiny-rss (tt-rss) server on a vmware virtual machine running Ubuntu. The virtual machine was running on a windows7 host. I also created a url that I was able to use to access the rss server from anywhere.
This was a reasonably straightforward process but along the way I ran into some minor roadblocks, all of which I eventually got past. I'm going to spell out in some detail what steps I went through for the benefit of anyone else who might want to do the same thing.
Although I was using a virtual machine to install my tt-rss server, these steps should work just fine for a normal, non-virtual ubuntu server. I this work using Ubuntu 13.04 which already has a version of tt-rss available via apt-get. However I found it easier to work with and configure the newest version of tt-rss from tt-rss.org rather than install tt-rss using apt-get.
It's probably not practical to actually run tt-rss on a virtual machine all the time but I did this as much as a learning process as anything else.
Step by Step:
- Creating the virtual machine. ( skip this if you are not using a virtual machine )
- Installing Ubuntu ( skip this if you already are running Ubuntu )
- Preparing the machine for tt-rss
- Completing the tt-rss install using a web browser
- Importing feeds from google reader. (coming soon)
- Accessing tt-rss from the internet. (coming soon)
Subscribe to:
Comments (Atom)